DirectorMonitor Overview
Welcome to DirectorMonitor. The all in one solution for monitoring and controlling your BlackMagic Design ATEM Mini video switcher. Paired with the Accsoon SeeMo video capture terminal to view the ATEM's MultiView, Program / Preview out or any HDMI video Source.
Screen Layout
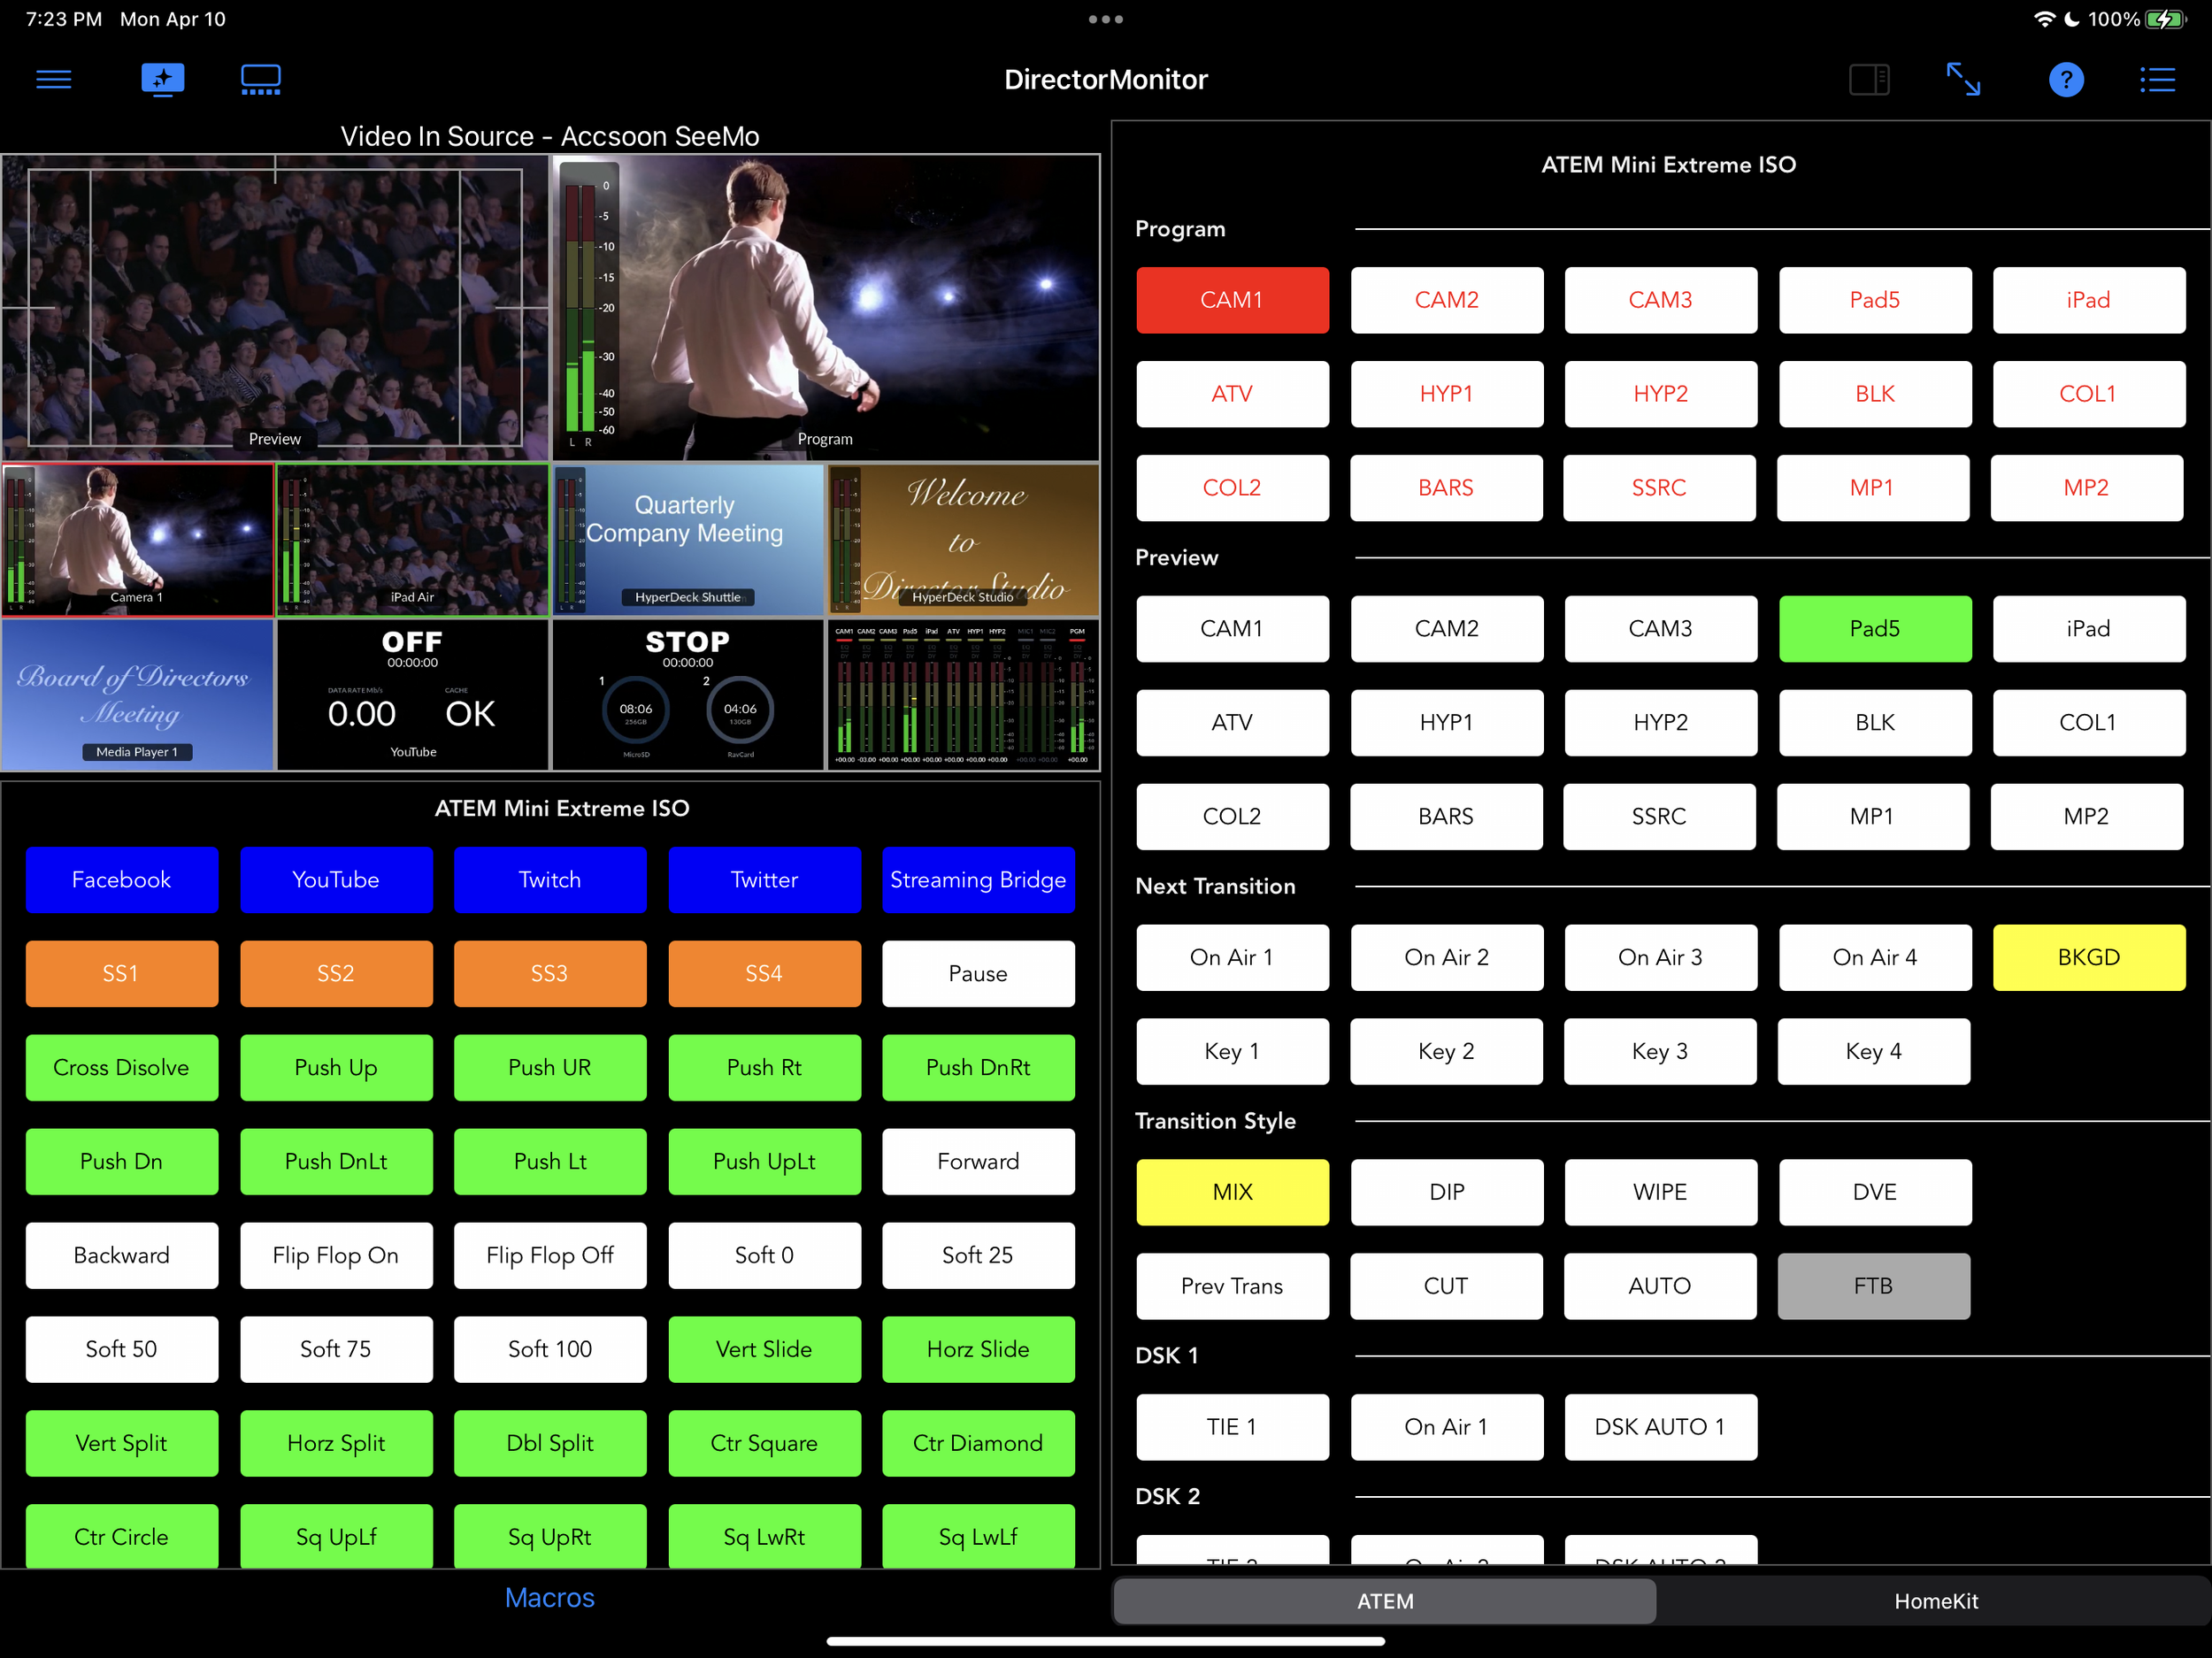
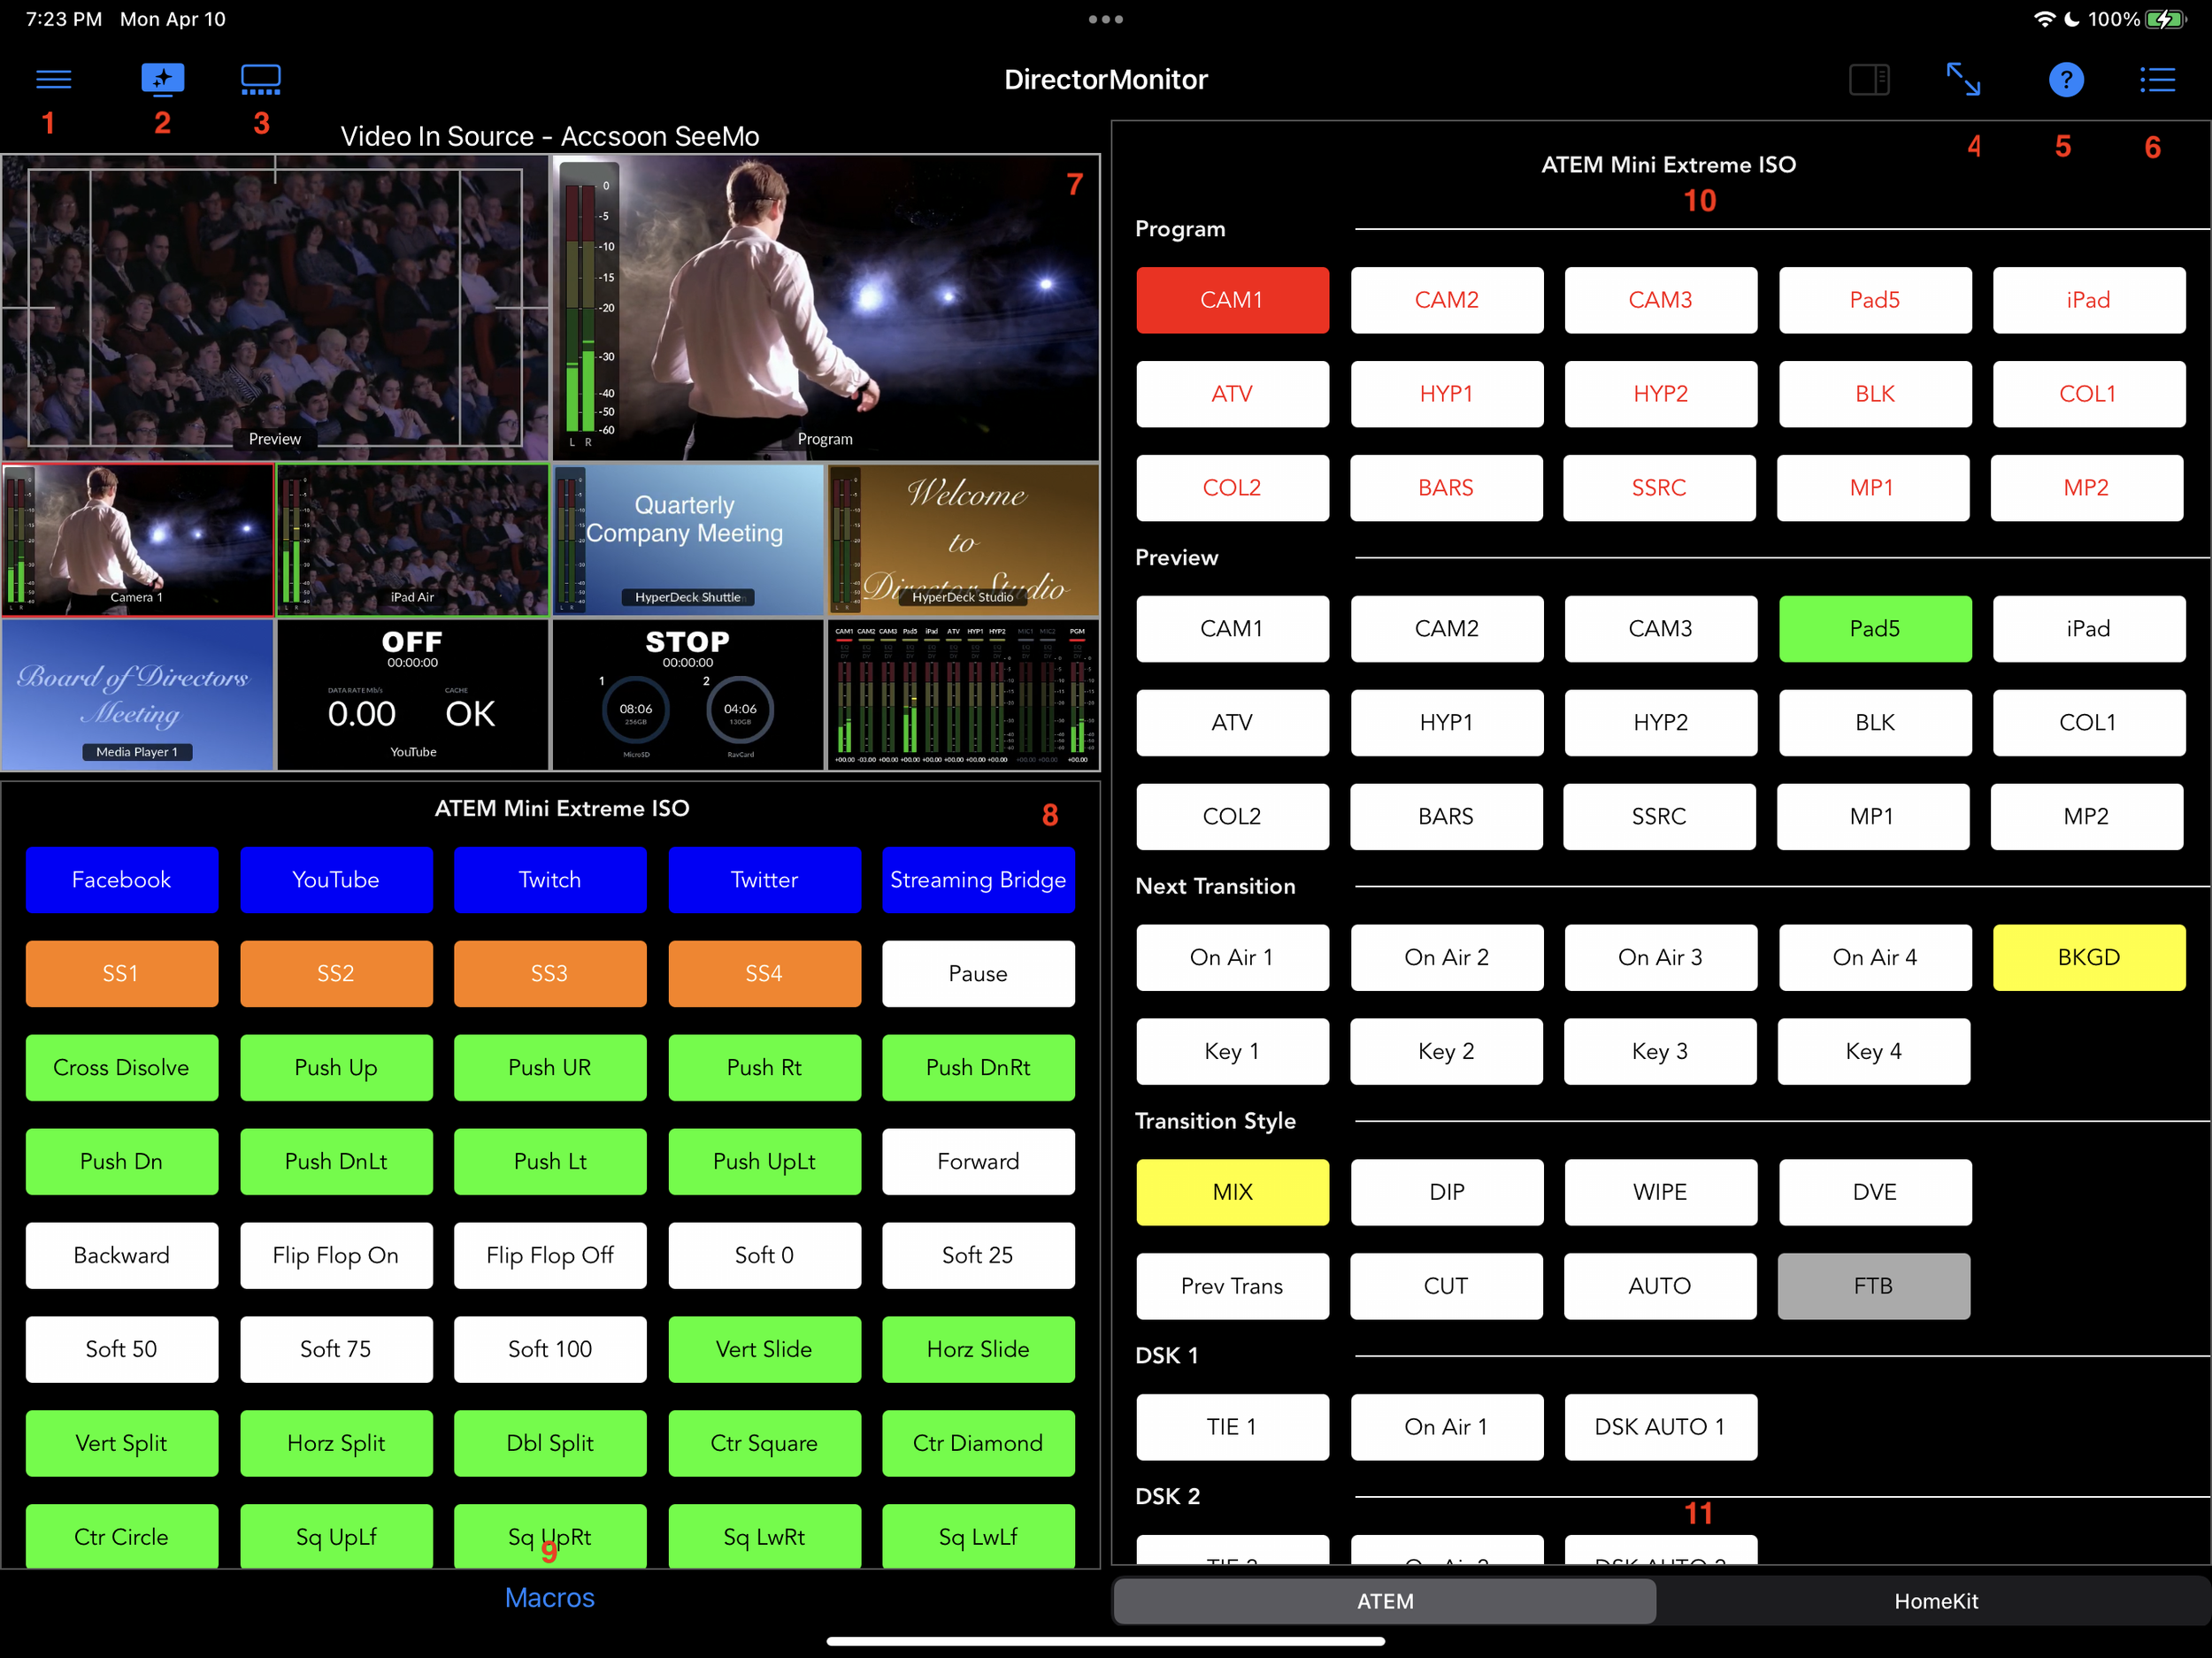
DirectorMonitor consists of a Primary screen with toolbar buttons and panels. Please Note the toolbar on devices running iPadOS / iOS 16 and later will look different but will function the same.
Main Menu - Access a variety of commands, including Settings and Help / Support
Toggle Video In Display - With a Video In device connected, this button becomes visible and allows toggling the Video In Source.
Toggle ATEM Menu - With an ATEM Mini configured and available, this button available allowing the selection of the ATEM Source.
Full Screen Video In - Re-configures the screen to display the video in as full screen.
Help Button - Help for the Application features and capabilities
Context Menu - Display a pop up menu with various options based on the Application configuration and state.
Video In Panel - Display of the HDMI video source from Accsoon Seemo or Febon UVC.
Left Panel - Selected button array
Left Panel Selection Button - Tapping this button displays a pop up menu allowing selection of the button array to display in the Left Panel
Right Panel - Selected button array
Right Panel Selection Tab - All remaining button arrays may be individually selected to display in the Right Panel.
Depending on the configuration a menu item will allow other device to connect to a wireless stream from the current device or connect a a stream from anther device. When available simply follow the prompts to connect the devices.
Main Menu
General
Settings - Display the Settings dialog (see below).
In-App Purchase - Display the In-App Purchase dialog in order to purchase DirectorMonitor.
In-App Purchase Features - Display list of current and upcoming features of DirectorMonitor.
Device Settings - Launch the Device (iPhone or iPad), Settings Application and selected the DirectorMonitor settings.
Support
About - Display the About dialog box for version information
Request Support - Launch an e-mail dialog to send Odeon Software a help or feature request.
Introduction - Display the Introduction Slide Show.
Request to Write a Review - Display the Review Dialog
Privacy Policy - Display Odeon Software’s Privacy Policy.
End User License Agreement (EULA) - Display DirectorMonitor End User License Agreement.
Context menu
Based on the Hardware Connected and the state of DirectorMonitor, the Context menu will have one or more of the selections
Refresh ATEM Buttons - With the ATEM Mini Connected, reload the buttons.
Customize ATEM Sections - Dialog to hide or reorder sections of the ATEM Mini Button Panel
Reconnect Accsoon SeeMo - With an Accsoon SeeMo, do a reconnection
UVC Settings - Display the Febon UVC Web Dialog.
Reconnect Febon UVC - With the Febon UVC Connected, do a reconnection.
Settings
General Settings
Device Name - Enter the name of the iPad, iPhone or Mac that you wish to indicate when Sharing between devices.
Enable Control Board - Enable / Disable the Control Board
Selected HomeKit Home - If you have HomeKit Enabled, select from multiple Homes if present.
Disable AutoLock
Never - Uses the system definition to Timeout the display
Plugged In - The device is receiving power, does not allow the timeout to occur.
Always - While DirectorMonitor is the active application, does not allow the timeout to occur.
Hide UI Element for Full Screen Monitor - Hide the navigation toolbar when monitor is set to Full Screen
Video In Settings
Video In - the Source of the Video In
None - Do not allow Video In
Accsoon SeeMo - use the Accsoon SeeMo as the HDMI Video In Source.
Febon UVC - use the Febon UVC as the HDMI Video In Source.
Share - This is a Beta experiment for streaming video between devices. To activate Sharing select the “Add Shared Connection“ from the context menu (upper right corner of the main screen) To share to a device. Note this is only available if you are using an Accsoon SeeMo. If would like to share from another device (that is connected to an Accsoon SeeMo) select Share as the Video In setting and to request to share select “Connect to Shared Video” from the context menu.
Share Server (or Client) IP Address (Blank to AutoSelect): When connected to an Accsoon SeeMo or Share the option to manually enter the IP Address of this device is available. This may address network issues or if the device has multiple network addresses, this will explicitly indicate the IP Address of the device. Leave this empty and the DirectorMonitor will attempt to determine the IP Address. Leaving blank is recommended and the IP Address should only be entered if connection problems persist.
PIN for Sharing: (tap to change) - When connected to an Accsoon SeeMo a four digit PIN number must be entered by the client to establish the wireless connection. Tapping on the number button will give the option to generate a new PIN.
Video In Connection Type
General HDMI - Connected to a general HDMI video source.
ATEM Monitor - Connected to an ATEM Mini - Enables the ATEM Output Selection Menu above the Monitor display.
Enable ATEM Monitor Touch Control - With the Video In Connection Type set to ATEM Monitor, when the Output Source the ATEM is set to Monitor, DirectorMonitor enables tapping on the panels of the display to activate a function.
ATEM Settings
ATEM # IP Address - IP Address of the ATEM Mini
ATEM # IP Enable - Toggle to enable and disable the ATEM Mini
ATEM # HomeKit Home - Select the Home you wish to associate to this ATEM Mini. Only available if HomeKit is Enabled
Note Up to three ATEMs may be added.
ATEM Control Board - Each ATEM may use a different control Board if “Each Separate” is selected or if ATEM 1 , 2 or 3 is selected any ATEM will always use that ATEM control Board. Tip: If the ATEM share the Control board it they should all connect to the same HomeKit Home.
Hide Title Names on Panels - Hide the Title of the various Panels (ATEM, Video In, HomeKit)
Hide Section Name on ATEM Panel - Hide the section names for the ATEM Panel
Hide Section Line on ATEM Panel - Hide the Dividing Line for the ATEM Panel
Enable ATEM Recording in HyperDeck Panel: - ATEM Menu Pro and later enables recording the Program out Feed directly to a storage device connected to the ATEM. Enabling this feature will add the HyperDeck Tab on the main screen (if needed) and an additional tab for the ATEM will be available. The tab allows viewing the recordings on the iPad while the storage is still connected to the drive. Video recordings may also be deleted or downloaded to the Files App.
HyperDeck Settings
HyperDeck # IP Address - IP Address of the HyperDeck
HyperDeck # IP Enable - Toggle to enable and disable the HyperDeck
Note Up to three HyperDecks may be added.


